October 24 & 25, 2020
I headed out to River Song before sunrise Saturday morning. Although the weather forecast promised blue skies, Big Red and I drove through a steady drizzle. Fortunately, the rain stopped just as the sun came up. I didn’t want to have to deal with both cold and rain today. And it was cold when I left the city.
Big Red was loaded down with lumber, saw horses, flashing, cinder blocks, and ladders–the usual. I had three goals for the weekend: Figure out why the propane tank I brought out last weekend wasn’t feeding propane to my Mr. Buddy heater, fix the leaking roof, and build a storage shed. Piece of cake, right? I should be able to get this all done in a weekend. No problem!
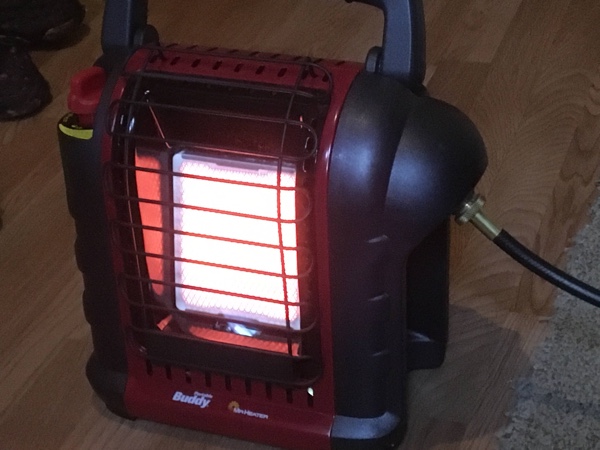
First task: Tackle the heat. Temperatures were expected to hit freezing Saturday night, and I wanted to be prepared. I have a zero degree sleeping bag, but I want heat, too. I’d tried connecting my Mr. Buddy heater to my 20-pound propane tank last weekend, and for some reason, propane just wasn’t getting through. I knew the tank was at least half full, and I also knew I had the correct adapter hose.
I reconnected everything, pressed the pilot ignition, and…flame on! It worked perfectly. I have no idea what happened last weekend, but this weekend, it’s fine. Sweet! First task done!
Second task: Tackle the roof. I bought a tube of Locktite Polyurethane Roof and Flashing Sealant to apply along the the roof seam and to the new flashing. But, at 42 degrees, it was still too cold outside to apply it. For now, I would clean the roof of leaves and other debris, removing the existing flashing, apply a coat of Kilz oil-based primer to the unpainted section of OSB siding under the original flashing, and allow the roof to dry. I could start the storage shed while waiting for the Kilz to dry and the day to warm up.
Third task: Build a storage shed. I picked out a location behind my cabin and cleared out the ferns and root balls. Digging out root balls is hard work and takes a long time. But, I had a nice spot cleared and leveled by early afternoon. Even though it hadn’t warmed up much, decided to work on the roof again. It was still only 45 degrees, and I needed 50, according to the Locktite instructions. It was supposed to hit 52 degrees today. But, temperatures were going to fall to near freezing tonight, and the Locktite needed 24 hours to cure.
I checked the roof and the siding. By this time, everything was dry, and the sun was shining directly on that section of the roof. There would be no better time.
I pressed some backer rod in the gaps between the metal roofing and the wall, creating a solid surface for the Locktite. Fortunately, I had just enough backer rod over from previous projects because I hadn’t though to buy more. And, the Locktite instructions specifically stated using backer rod for this. Nice!

Next, I clipped the end off the Locktite tube and pressed the caulking gun trigger. It wouldn’t budge. I’d read about this on the Internet. This stuff is super viscous and hard to squeeze out. And, I still don’t have all the strength back in my hands after my surgery a couple of weeks ago. Finally, I pressed the trigger against the doorframe and applied my substantial weight.
That worked. Slowly, slowly, slowly, a thick line of sealant snaked out the nozzle. How do you get that stuff on now? I couldn’t get it to spread where I wanted; it just kept falling on the roof. I tried spreading it with a chisel, and that didn’t work, either. It was too hard trying to balance on one knee and one carpal tunnel wrist while using the other carpal tunnel wrist to manipulate the chisel.
Finally, I gave up and used my finger. It was pretty nasty, but effective. I spread a long line all the way along the seam of the roof where it met the wall, using about half the tube. It was really ugly, but it looks like it should keep water from entering the cabin. That’s all that really matters.
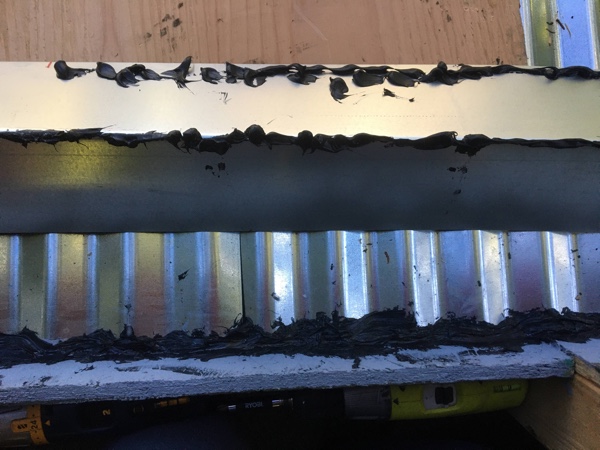
I let it rest for a bit while I took a lunch break, and then I applied a line of Locktite to the top edge of the flashing where it would meet the wall, and also along the bottom edge of the flashing’s 90-degree bend. This was just for added protection, and it finished up the tube.
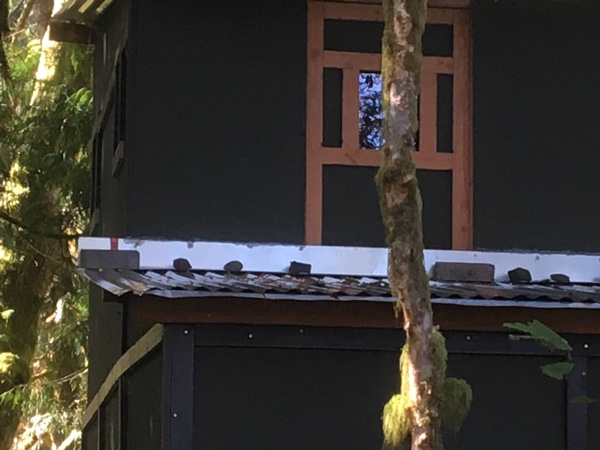
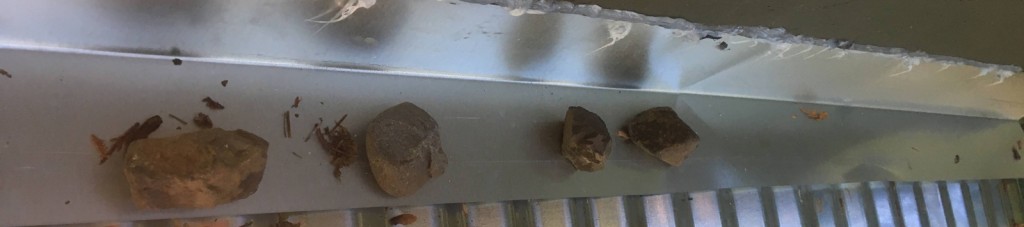
I carefully turned the flashing over and pressed it into place. The Locktite held it firmly. But, for added security, I added screws about every 8-12 inches along the top of the flashing. I’ll add a few screws along the edge overlapping the metal roofing after I confirm the roof no longer leaks. For now, I set eight or ten rocks along the edge just to weight it down a bit.
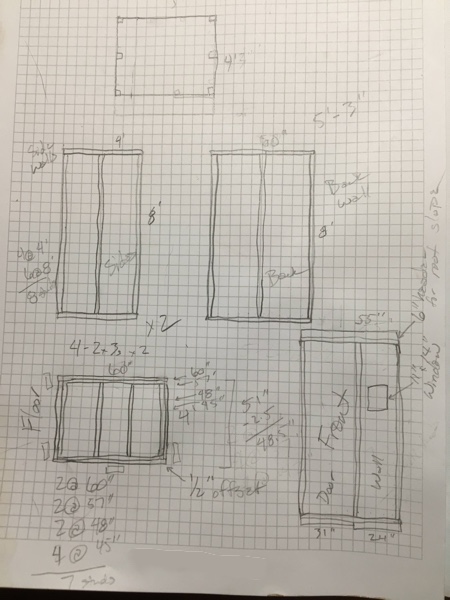
Back to the storage shed. I’m building the 51″x 96″ shed by hand from my own plans. I will be using cinder blocks for the foundation, 2×3 studs for the framing, plywood scraps for the floor and walls, and corrugated metal for the roofing.
When I framed my cabin last February, 2×4 studs were about $2.50 each. For several reasons, some of which are political, those same studs are now almost $6 each. However, 2×3 studs are about $3.50 each, which is why I went with 2x3s. For a small storage shed in an area with no significant snow load concerns, 2x3s should be fine.
Also note these are regular whitewood 2x3s; they are not pressure treated. My budget will not allow me to use pressure treated lumber, so I am using what I have–cheap, whitewood, interior-grade studs. They will be fine. This is a budget shed at a rustic weekend recreation cabin. If I get ten years use out of this shed, I’ll be super happy.
Because I want the shed to be slightly wider than 48″, I placed the shorter joists (floor studs) on the inside of the two longer ones, making the short side an odd 51″ wide. (Forty-eight inches wide, plus 3″ for the width of the two 2x3s.) Normally, you’d probably want to do the opposite, trimming the longer joists so the walls would be an even 48″x 96″, or 4’x8′, on the exterior. It just makes things easier, neater, and involves less work because the 4’x8′ exterior sheathing would fit perfectly.
But, I’m building this shed with scrap plywood. Everything will have to be trimmed. And, I want to store full sheets of plywood and OSB inside, so I want the 48″ width on the interior, rather than the exterior.
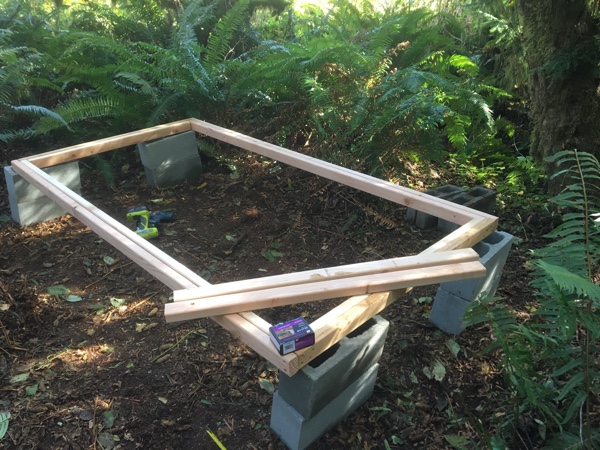
Makes sense? I know it sounds confusing, but it should be pretty clear when I’m finished. I’ve put a lot of thought into this.
I framed most of the floor, and then my hands gave out. That little twist kick every time I pressed the drill’s trigger really took its toll. Every jar, every twist, every jolt added up. And by 4:00, with two hours of daylight still left, I was done. I packed up my tools and headed in for the night, thankful for the warmth of my Mr. Buddy heater.
Coyotes in the Night
I turned in early Saturday night, both exhausted from the day’s work and also a little bored as I had brought nothing with which to fill my evening hours. In the early hours of Sunday morning, I was awakened by coyotes singing to the first quarter moon. They sounded as if they were right outside. Although I have no fear of coyotes, I was grateful for my strong walls. And, for the next two hours, they sang every few minutes, like a chorus of ancient voices responding to a primal call. It was both eery and sacred.
I was also grateful for my Mr. Buddy heater, which kept the cabin at a relatively toasty 52 degrees. This was the first time I’d left it running all night. It was a luxury I could now afford with my newly connected 20-pound propane tank. Based on its past performance with the little green Coleman canisters, I calculated I should be able to get about 100 hours of heat from the larger tank. And, for roughly the same cost.

Sunday, October 25
I’d already decided I wasn’t going to get very far on the storage shed today. I don’t need to strain my hands to the point that it affects my healing. The shed is something that I want, not something that I need. I can take all the time in the world.
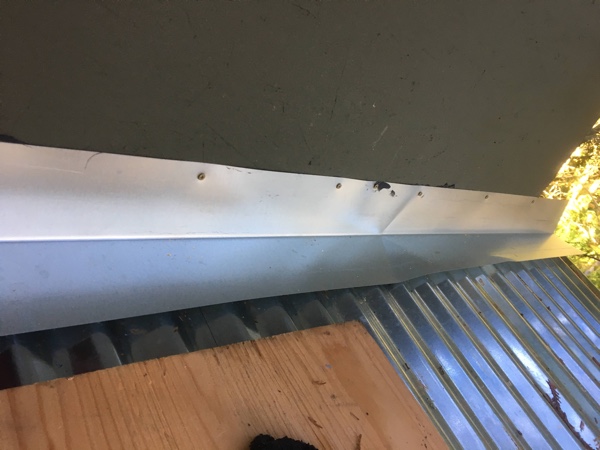
But, before I continued on shed, I needed to finish the roof. I didn’t need to do much, just run a bead of silicone along the top edge of the flashing. Just enough to keep water from getting in between the flashing and the wall. It took only a few minutes. And, while I was at it, I put big glops of silicone over each screw securing the flashing to the wall. The silicone got all over everything, but I don’t care. It’s clear, so no one will be able to see the mess unless they’re on the roof, which isn’t likely. And even then I don’t care.
After that was done, I added four bricks along the lower edge of the flashing just for a little added weight. If the roof doesn’t leak this next week, then I’ll add a few screws to secure the lower edge to the metal roofing and call it good. But, if the Locktite, flashing, and silicone don’t stop the roof from leaking, then I don’t know what will, and I’ll have to hire a professional to take a look at it. That would be really disappointing. Let’s hope this works!
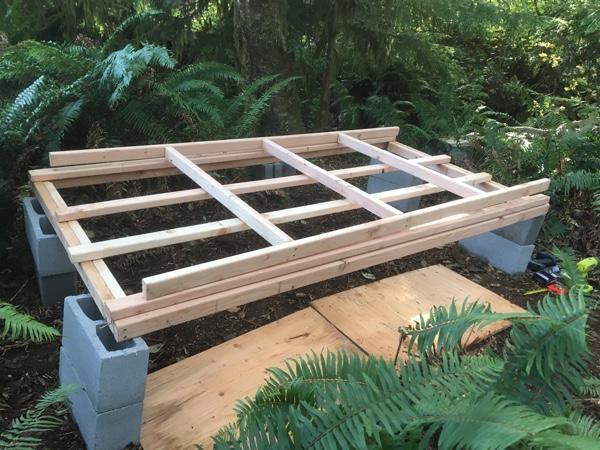
That finished task number two for the weekend, so back to the shed. I wanted to double-up the studs in the floor joists to give the floor additional strength. This would also create a greater surface where the joists touched the cinder block foundation, making it more stable. And, I needed to add three additional joists, one every 24″, to support the flooring material.
Sounds easy, right? And it was, until I went to add the three additional joists. And quickly discovered I couldn’t do that. Why? Because the outer joist frame is now 3″ thick, and I didn’t have drill bits or screws long enough to go through the outer joists and into the inner joists.
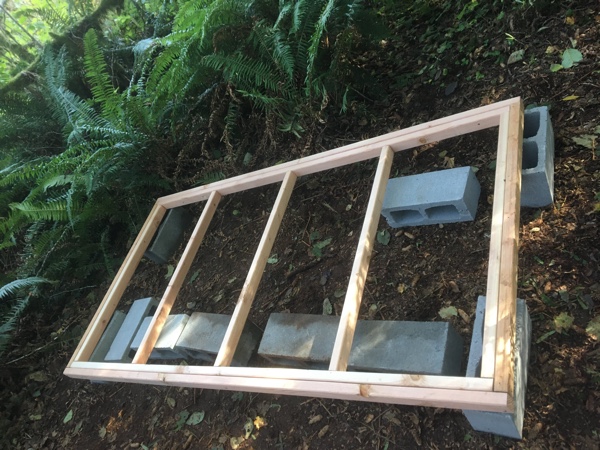
D’oh! I’d have to take it apart! But, I figured it out, and it really was super easy. I removed the two longer joists on the inside, attached the three inner joists, and popped the entire thing back into the exterior joist frame. Perfect solution!
And that was enough for the weekend. Time to clean up my mess! I stored my unused studs under the floor frame, covered it with plywood scraps, and threw a tarp over the entire thing.
So, tasks number one and two are completed, and task number three is well under way. I packed up my tools, cleaned up the cabin, and got ready to head out. Before locking up, I laid paper towels on the floor below where the roof has been leaking. If it leaks again, I’ll be able to see the evidence on the towels, even if it has time to dry.
And that was a weekend!