August 14, 2019
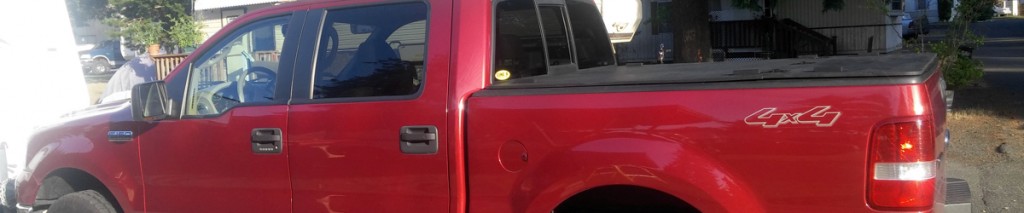
I haul a lot of gear to Burning Man: bike, cabin tent, cot, sleeping bag and pillows, throw rugs, chair and tables, clothes, costumes, food, water, and more. In the past, I’ve driven my Ford Sport Trac, which has a canopy. Everything in the truck bed was secure and safe from the environment and “accidental” pilferage. However, this year, I was driving my new-to-me Ford F150. Since I already have one truck with a canopy, I did not want to buy another. 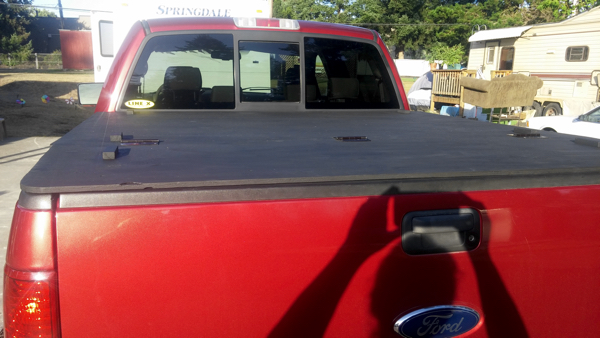 I looked into purchasing a tonneau cover for the truck bed, but they’re expensive. And, more importantly, they’re either flimsy and not very secure, or they’re bulky and heavy. And, a PITA to store when not needed, which is most of the time.
Solution: Build my own.
I could build one out of plywood for about $60. And, after Burning Man, I could take it apart and repurpose the wood, so no need to store it. Sweet! Problem solved!
Building a tonneau cover is pretty easy and took only a few hours. Bonus: It looks pretty awesome, too!
Materials: Two sheets of standard 1/2″ plywood, two 8′ 2x2s, three door hinges, a bunch of 1″ screws, six medium eyelet screws, 50′ military strength paracord, eight quick links with barrel screws, some weatherstripping, and a pint of flat black exterior paint.
Tools: Skillsaw, jigsaw, drill, sander, and a paintbrush.
 Plan: Two pieces of plywood, hinged in the middle, with 2 x 2s along the edges for weather resistance and to keep the tonneau from sliding. Plus tie-downs underneath for added security and stability.
I have the F150 supercrew cab, which has the 5.5′ x 5.5′ truck bed. I wanted the tonneau to cover it from edge to edge, so 6′ x 6′. Plywood is 4′ x 8′ per sheet. I could cut two 3′ x 6′ pieces, or I could cut one 4′ x 6′ piece and one 2′ x 6′ piece. My truck bed is too high for me to easily reach over the top, so I went with the asymmetrical design. A two-foot hinged section at the back, along with the tailgate, would provide sufficient access. Plus, it meant one fewer cut, which is always a bonus. I’m basically lazy and happy to take any shortcuts I can. Sweet!
But, more on that later…
I cut my two plywood pieces using a 2″ x 4″ and some clamps as a saw guide, ensuring a straight cut. I then set the pieces on top of my truck bed to ensure they were sized correctly, and they were. However, I noticed the back corners of the bed were rounded, so I traced the outline on the smaller plywood piece and then rounded the corners with my jigsaw. I then sanded both pieces–top, bottom, and edges–to get rid of jaggedy bits.
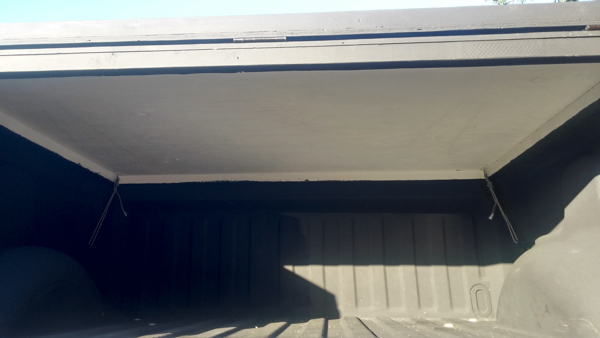
I cut the 2″ x 2″s to the appropriate lengths to hold the pieces snugly against the walls of the bed. This would help protect the bed contents against water and dust. And, it would help hold the tonneau securely in case of sharp turns or quick stops. I also added 2″ x 2″ pieces along the edges where the plywood met so the hinges would be stronger and more stable. These were sanded and then attached to the plywood using 1″ screws.
 Everything was painted black to match the black bed liner. Two coats. Except I ran out of black paint, so I painted the interior of the larger piece white.
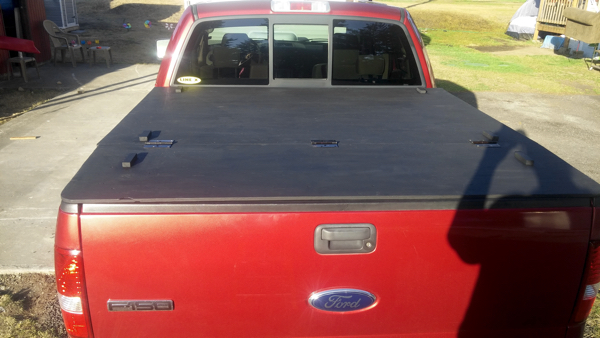
After the paint had a chance to dry, I put the cover on the truck and aligned it. I attached the three hinges and tested. It worked great! Everything fit snugly, the lid opened and closed easily, and the cover didn’t interfere with the tailgate.
I then cut six 4″ strips of 2″ x 2″ and attached them to the top of the tonneau above where the eyelet screws would go. Next, I crawled inside the truck bed and screwed six eyelet screws into the bottom of the tonneau and up into the small blocks of wood. This did two things: 1) The eyelets provided a means by which to secure the tonneau to the tie-downs inside the truck bed, and 2) the blocks of wood created a stronger surface for the screws to attach. 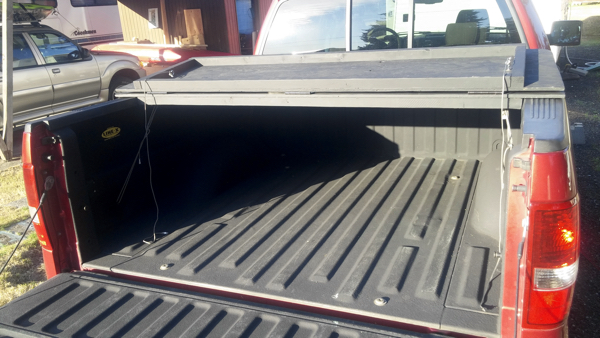 Moreover, ALL of the screws to this point were on the OUTSIDE of the tonneau, meaning breaking into the truck bed would require only a screwdriver and a little bit of time. But not now! Even if someone were to remove all the screws on the top of the tonneau, including the hinge screws, the tie downs would still secure it nicely. Will it stop a determined thief? Of course not! Neither will an $800 tonneau. But it will keep honest people honest.
Next, I cut six lengths of military-strength paracord, looped them through eyelets and the quick links, and then tied them using adjustable slipknots. (Slipknot is both a great knot and a great band.) For convenience purposes, I used two quick links on each of the hinged lid’s tie downs. The only way to release the tie downs and open the tonneau is through the tailgate, which I can lock, keeping the contents secure.
 The cover was now almost complete! A few days later, we got quite a bit of rain, and the cover leaked a little bit. So, I added a few strips of window weatherstripping along the hinged section and some strips of air conditioner window weatherstripping along the front. No more leaks!
The cover kept my friend Char’s and my stuff dry, clean, and secure on the drive to and from Burning Man. And, it kept out most of the dust during my 11-day stay. It was definitely worth my time!
And, about that asymmetrical design… If I were to build this again, I would take the time to cut the two pieces the same size. Why? Because that 4′ section makes the tonneau super awkward to remove and carry. It would be much easier if both pieces were the same size.
However, it did the job, and it looked fabulous! All for about $60.